Published
- 4 min read
Rebuilding my instances to use gp3 EBS volumes
It’s been a long time since my last blog post.. but recently I’ve decided to spend a bit of time to replace my EC2 instances. Previously my instances were using gp2 EBS volumes while gp3 provides a much greater performance and at a lower cost. You will find out why I had to replace my instances instead of just changing the EBS type as you read on.
For more information on the differences between gp2 and gp3, you can take a look at this AWS blog here.
Here is a quick comparison chart between gp2 and gp3.
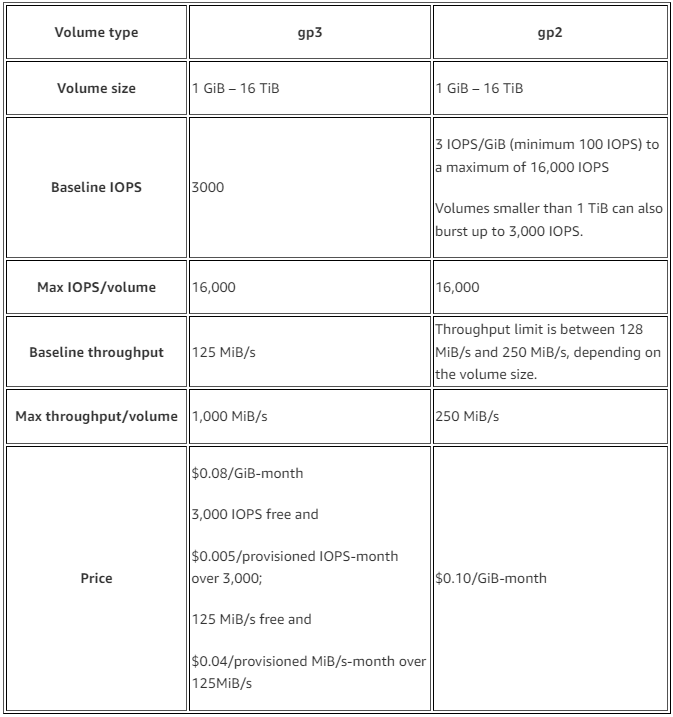
The biggest improvement for me here was the baseline IOPS, but I am also getting a 20% cost reduction (although is not much since my volume size is very small).
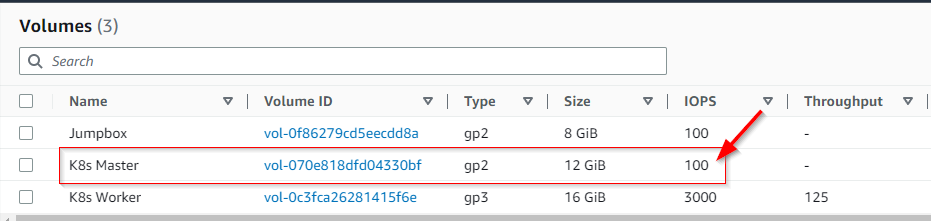
Previously for my 12GB volume, I was on 100 IOPS, but by changing it to gp3, I now get 3000 IOPS!
How did I do it?
Since my infrastructure is all provisioned using Terraform, I had to do this through code, otherwise it would’ve been as simple as changing the volume type via the console with a few clicks.
The AMI I initially referenced was using gp2 and there is no easy way to update my existing Terraform code to tell it to use gp3 for the volumes.
If you want to skip ahead, you can see the PR code changes on my GitHub repo.
My requirements
Before proceeding, I had to determine my requirements and they are:
-
Must be minimal effort (e.g. no re-deployment via Ansible or any OS configuration changes).
-
No IP changes (otherwise the Kubernetes cluster needs some rework).
-
Can easily fall back in case this doesn’t work out.
Challenges
As I started looking into this, I came across a few challenges.
-
Original EC2 instances were created using an existing module and I don’t have control over some resources.
-
Existing IP was not static as it was auto generated by DHCP when the instances were created via the module.
-
Original ENI was created by the ec2-instance module and is not managed separately.
-
When the EC2 instance is terminated, it will also destroy the existing ENI (which holds the IP).
Solution
In order to ensure I do not lose the IP address, I had to disable the “Delete on termination” manually for the ENI’s I wanted to keep.
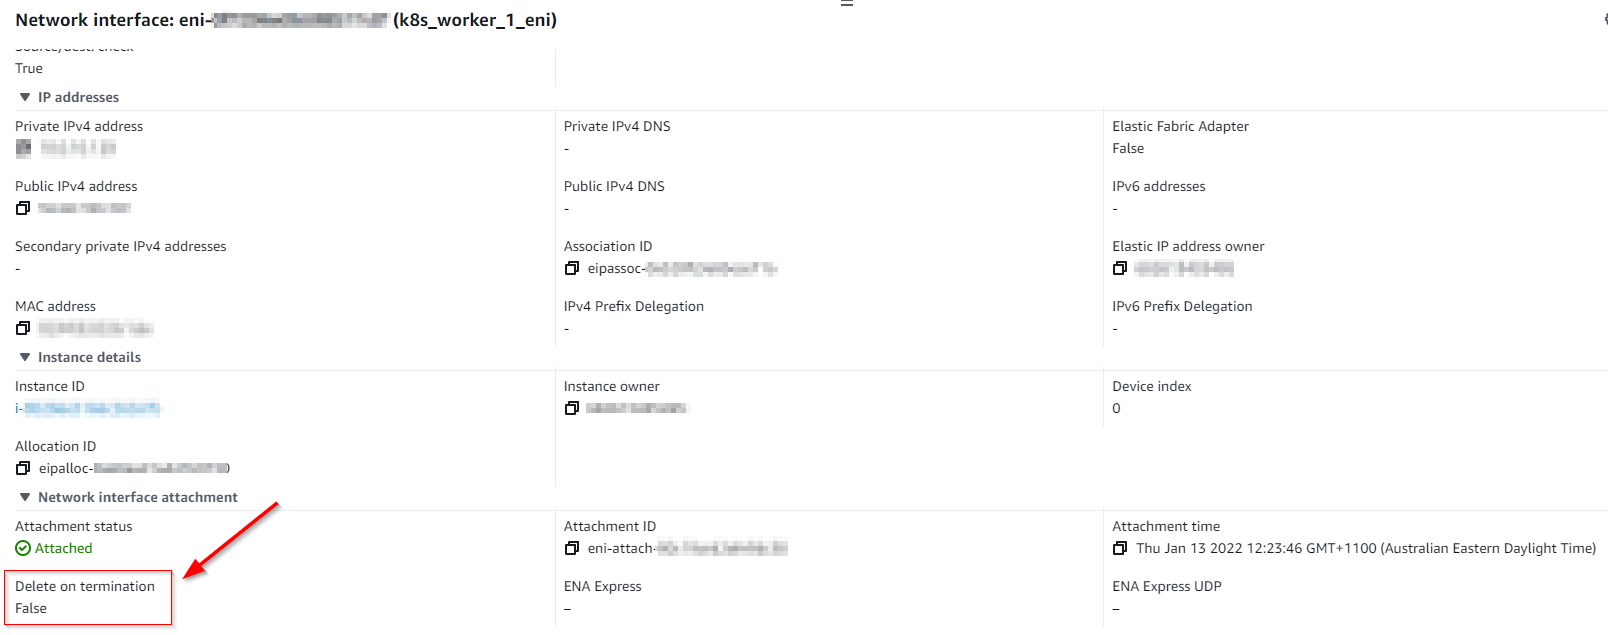
Once that is done, I created 2 Terraform resources like:
       resource "aws_network_interface" "k8s_master" {
  subnet_id = var.vpc_public_subnets[0]
  security_groups = [aws_security_group.k8s_master.id]
  tags = {
    Name = "k8s_master_eni"
  }
}

resource "aws_network_interface" "k8s_worker_1" {
  subnet_id       = var.vpc_public_subnets[0]
  security_groups = [aws_security_group.k8s_workernodes.id]

  tags = {
    Name = "k8s_worker_1_eni"
  }
}
Then I’ve used terraform import to allow Terraform to manage this resource for me.
       terraform import module.kubeadm_cluster.aws_network_interface.k8s_master eni-xxyyzz
terraform import module.kubeadm_cluster.aws_network_interface.k8s_worker_1 eni-aabbcc
Now I got the basic configuration ready, I can now prepare for the cut over. I first started with the “k8s worker node” since it is a low risk server and here is what I’ve done in a high level:
-
Shutdown the server to ensure the next step is clean
-
Create AMI (which also creates a snapshot of the volume)
-
Remove the old terraform code where the EC2 instance was created (targeting a single instance only)
-
Run terraform apply to destroy the instance
-
Ensure the ENI is still on AWS and its in an “available” state
-
Updated Terraform code to:
-
Reference the AMI created above as the base image
-
Use gp3 based EBS volume
-
Attach ENI by referencing “aws_network_interface”
-
Ensure all other configuration such as IAM role, security group and tags are the same as before
-
-
Run terraform apply to deploy a new single server.
-
Verify existing IP, security groups and IAM role is correct
-
Verify the Kubernetes services are running and working.
Once the above has been verified to work for the worker node, then I have repeated the same steps for the “k8s master node”.
Since I no longer require the AMI I’ve created during this transition, that AMI and snapshots are deleted to reduce unnecessary costs.
Conclusion
This was a lot more work then I first anticipated, but is it worth the effort? well, going from 100 IOPS to 3000 IOPS for a 20% price deducting it sure is!
I have many other topics I would love to blog about, but I just don’t have the time these days.. but the next thing I really want to implement for my blog is the usage of CloudFront. So I really hope I can spend some time on that and then write a post about it.